Saving money on Amazon Web Services (AWS) Spot Instances can be a challenging task. Keep in mind that it is essentially an auction. Although prices don’t fluctuate as rapidly as on exchanges, they can still increase until they reach the on-demand rate. Sometimes it lasts for a day or two, but other times — up to several months, which can double the cost.
How do you avoid a situation in which, for example, everything went perfect in November, but in December, the prices doubled amid the holiday hype — and you got not only an expensive system but also one with interruptions? Let’s examine why this happens. For this, let’s look at Spot Instance allocation strategies and see how you can use the Terraform module with no issues and save money at the same time.
A Spot Instance is an unused EC2 (Elastic Compute Cloud) resource put up for auction at a minimal price. Its main drawback is interruptions, so, be ready. Spot Instance interruptions are not out of the ordinary — they are part of the workflow rather than some kind of incident.
There are three main reasons for interruptions:
- The current price is higher than what you are willing to pay.
- There are no Spot Instances of the type you are using left.
- You have set additional restrictions — for example, when you set all Availability Zones at first but then left only one. Interruption information will be delivered via EC2 Metadata Service and EventBridge. These services will allow you to do some processing, but it should be noted that AWS SLA for a single instance is only 90%, so you should expect interruptions in all instances, not just in spots.
Simple Ways To Deal With Interruptions
Add Stability and Elasticity
To make your Spot Instances more stable and resilient, use an Auto Scaling Group. Then, if you experience an interruption, you will be able to finish some tasks or, at least, get a new instance to replace the previous one.
Increase Your Chances of Launching
AWS uses different Instance Types by default. But if you manually create an Auto Scaling Group, you will see a full list of all possible Instance Types. And if you don’t have some particular type, you can use other ones. In some cases, you can even use their previous generations. AWS has statistics for all Instance Types tracking the interruption probability for each region. Therefore, it is best to choose an Instance Type from the Spot Instance Advisor service. Here, you will see which types are better for each specific region. You can also quickly sort them while staying on the page — for example, sort by which ones were the least affected by interruptions during the past month.
Spot Instance Allocation Strategies
There are several allocation strategies. They affect where a Spot Instance will be launched from and from which Spot Pool (a set of unused EC2s within the same Availability Zone and Instance Type).
Default Strategy
The default allocation strategy is capacity-optimized. It allows you to get a Spot Instance from a Spot Instance Pool with the most available capacity. Moreover, when combined with an Auto Scaling Group, there will be only one Instance Type selected per Availability Zone — which is less likely to fail. This is a very good strategy for loads that are expensive to interrupt. But if you want to save more, there is an alternative.
Lowest price
This strategy will select a Spot Instance from multiple Spot Instance Pools in each Availability Zone with the lowest cost per spot. You can even specify the number of spots to choose from. The default is two, but you can set up to 20. This also works well with an Auto Scaling Group and instances of multiple types, meaning we can get different types of instances in different Availability Zones. While it’s convenient, you should keep in mind that the lowest price is followed up by the most interruptions. This is because we will no longer have indications of which Spot Pool has the least chance of interruption.
Sustainability With Capacity Rebalancing
The method of improving spot resilience with the new signal EC2 Rebalance Recommendation was made available in 2020. It can arrive sooner than the standard two-minute Spot Instance interruption notice. Thus, EC2 Auto Scaling launched the feature of Capacity Rebalancing:
Capacity Rebalancing
EC2 Auto Scaling Capacity Rebalancing
Let’s get into more detail about it since it added more stability to the spots. First, you get a message notifying you of the Capacity Rebalancing signal. The Auto Scaling Group (or a third-party script from which you have received this signal) then starts a new instance running through all of its processes. After that, the instance that has an elevated risk of interruption and that received the Capacity Rebalancing signal will begin to terminate.
There is finally a way to correctly handle the termination of a Spot Instance. You can add Lifecycle hooks for your Auto Scaling Group, put the instance in terminating, or take an event from EventBridge and invoke a Lambda function on it with some kind of logic. For example, in the case of containerization (ECS or EKS), you can remove all Pods/ECS Tasks from this instance and avoid interrupting the load at all. These simple recommendations may be enough for some people. But let’s go further and see how you can save money while also achieving high efficiency.
How Much Does a Spot Instance Cost?
This is probably the most important question. To answer, we’ll use a couple of tools:
- The good old Cost Explorer, with basic and accessible information;
- An additional Spot Instance data feed — a detailed report in S3, which is enabled in the settings. Let’s first examine how to use the Cost Explorer. We’ve grouped the spots by Instance Type, filtered them by Usage Type Group EC2 Running Hours, and set the important option called Purchase Option Spot. As a result, we get two graphs: Costs and Usage:
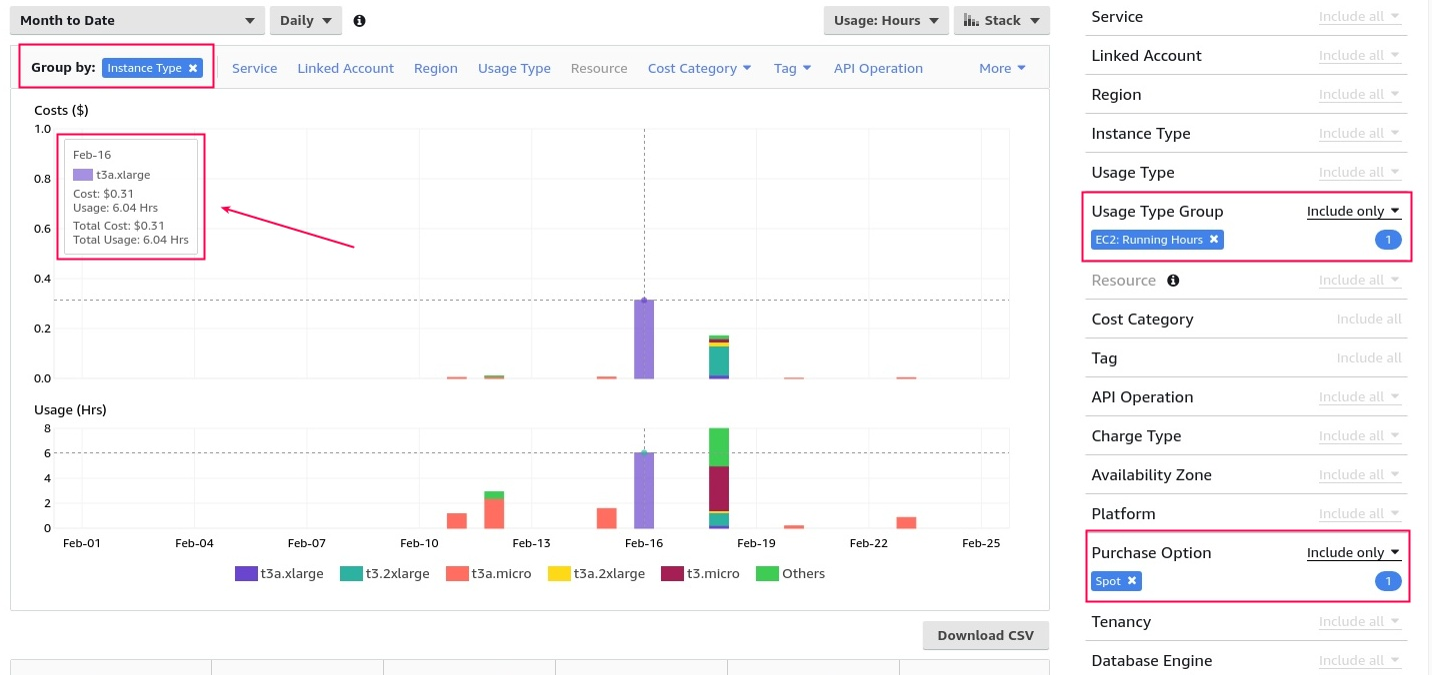
Technically, they can be used to determine the average price per day — just divide one by the other. If you add filters by tags, you can get a general idea of what is happening. But when you get many different Instance Types in the results, it becomes more difficult. Besides, there is no detailed allocation by hour by default. Of course, it can be included in the Cost Explorer, but it’s not really necessary for this task, and it’s also not free. Therefore, let’s now take a look at the Spot Instance data feed. New information is added every hour but with delays. The tests show that delays can last from 15 minutes to several hours: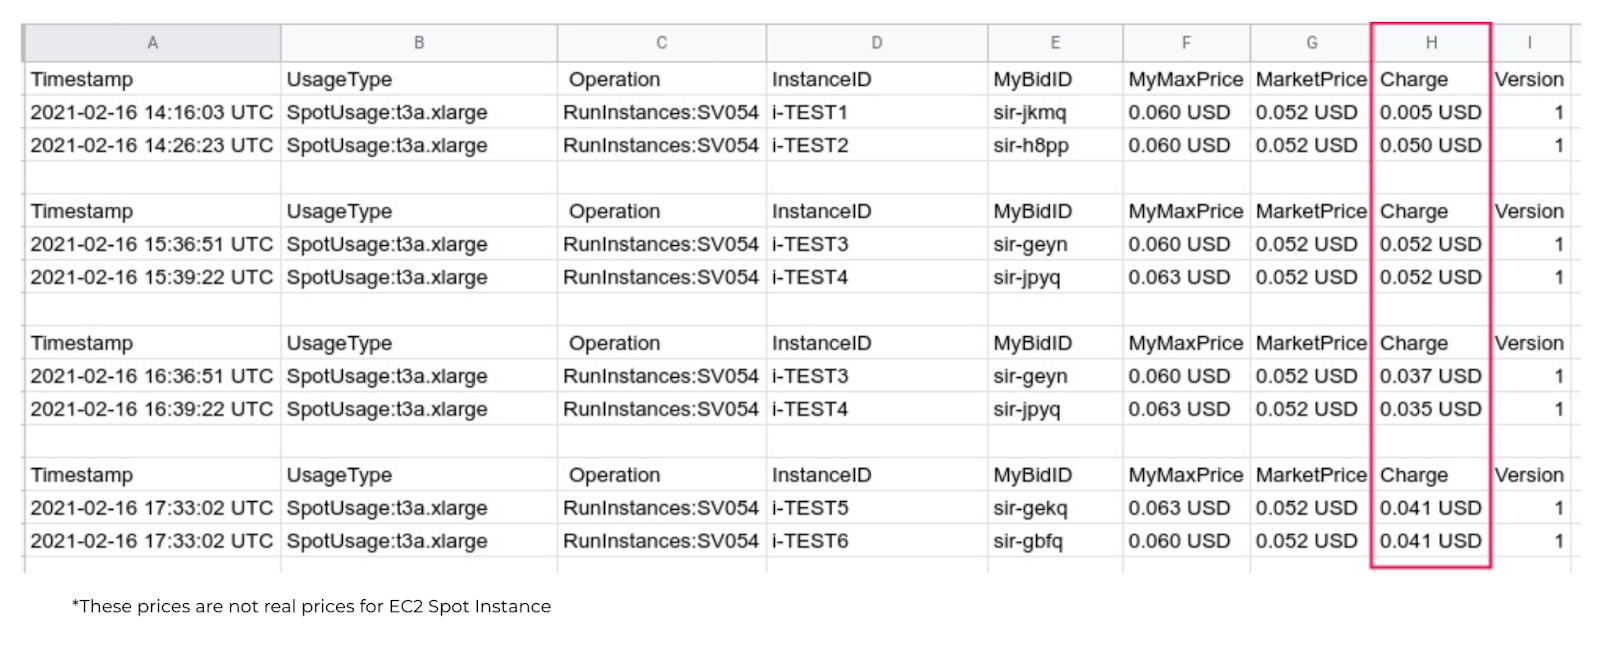
The most important thing that you can get from the Spot Instance data feed is detailed information with the instance type, the maximum price, the current market price, and, finally, the price you paid (the Charge column). As for the set-up process, you’ll need a slightly customized ACL for S3, although there will be no trouble with that.
Spot Instance Data Feed Settings
The current price is called the Spot Price (the Charge column). This price is set per Availability Zone and Instance Type based on supply and demandon Amazon . It is progressively adjusted based on long-term forecasts. However, it is worth noting that the dynamics of upward and downward price changes are rather smooth — meaning that prices don’t change by the hour, and if it’s $1 one day, it won’t be $3 the next day.
Therefore, you can use an important but lesser-known setting called Spot Max Price. This is the maximum price you are willing to pay for a Spot Instance. As soon as it reaches a higher level, you simply stop paying. People often failed to configure Spot Max Price because it was not included in the UI, and users had to be set through SLA. But since then, it’s been added to the Spot request.
Setting the Spot Max Price is very important. If you fail to specify any value, you automatically agree to pay any price up to on-demand (which is essentially the price ceiling). For example, look at the price dynamics during the December holidays for three different Instance Types: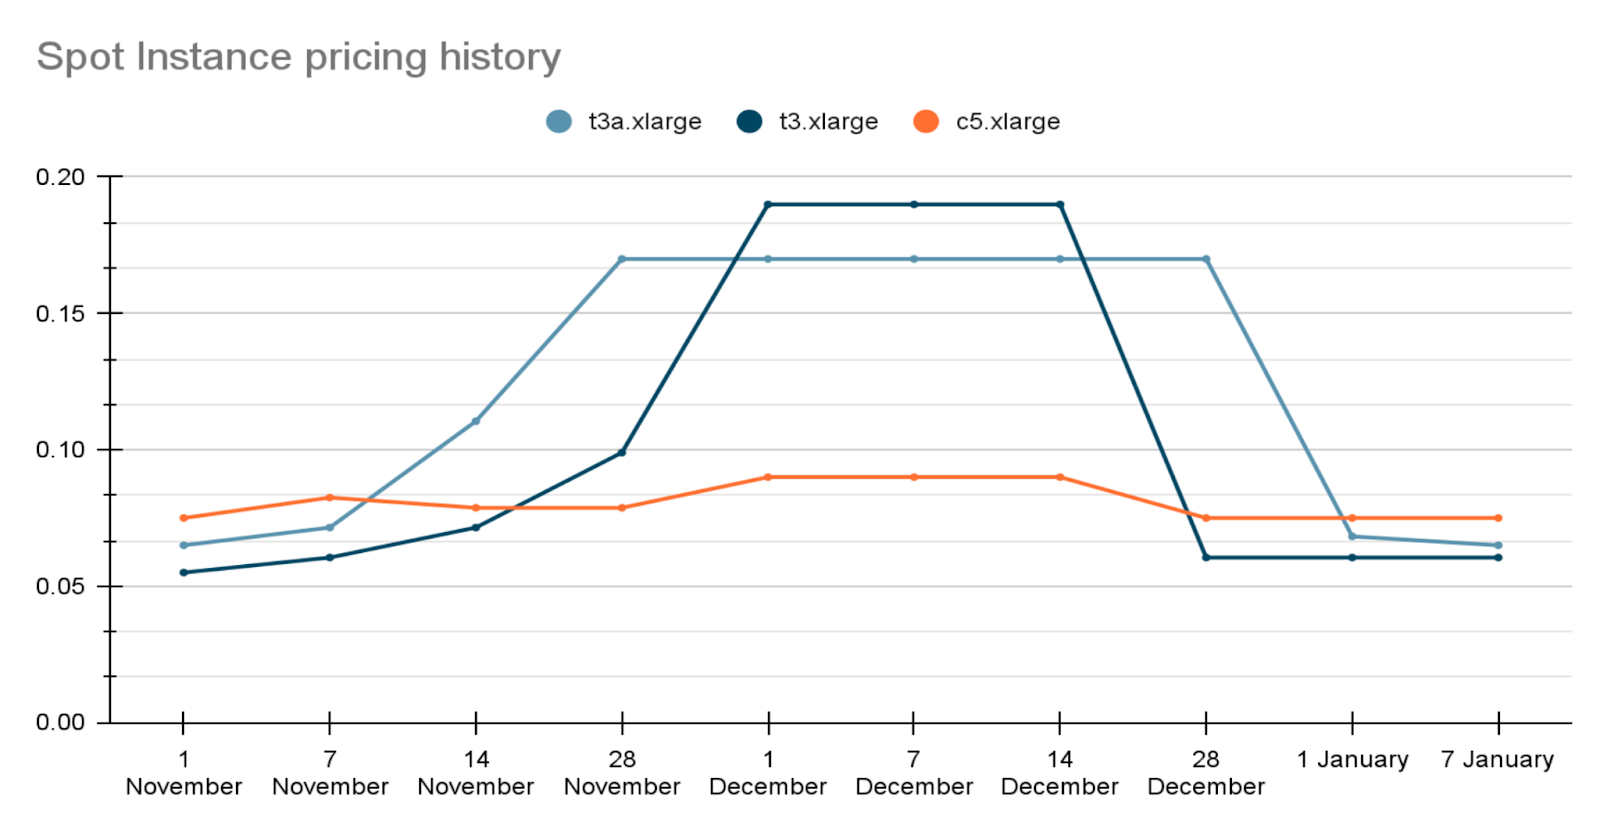
At first, the most cost-effective type was t3a, but since it’s cheaper by 10% on average, the demand for it started growing. People began buying it at a rapid pace, and at some point, t3 became more cost-effective. And when people bought it out, c5 became cheaper, which was rather unexpected.
Keep in mind that a type A Spot Instance is often more expensive than usual ones. The common reason is their popularity — they are cheaper on-demand and bought more often. You may think — what should you do then? Drop Spot Instances outright? Well, don’t rush it. There is a solution — the Terraform module will help you solve most of these problems without having to constantly monitor the spot price history.
Terraform Module
The module solves the problem of automating how the Spot Max Price is calculated. It has several behaviors that can be useful:
- spot_price_current_min — at least one Instance Type in at least one AZ;
- spot_price_current_optimal — at least one Instance Type in all AZs;
- spot_price_current_max — all Instance Types in all AZs;
- spot_price_current_max_mod — all Instance Types in all AZs with increased reliability. Let’s go through them from simple to complex using the price matrix as an example:
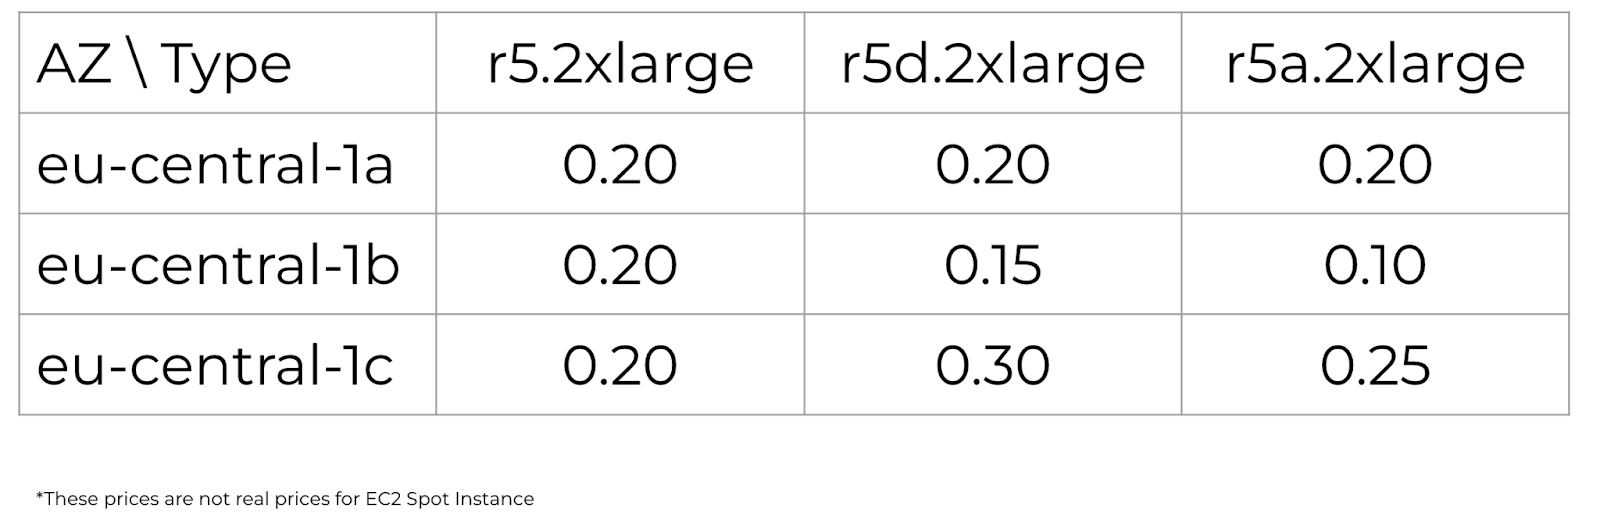
First, we get the current spot_price without opening the UI and Spot price history. This is the simplest example: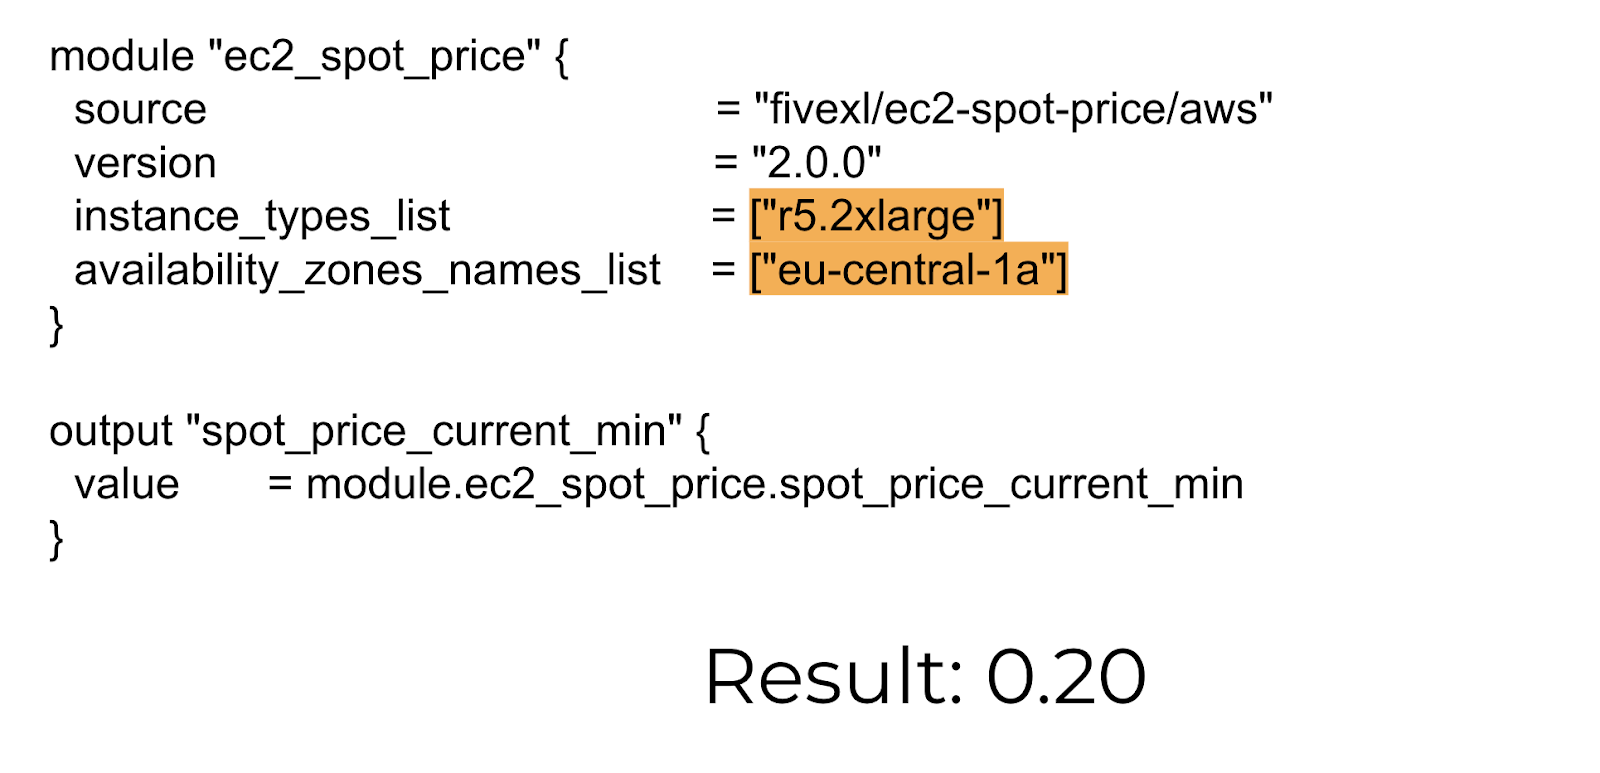
Minimum Price
This is a slightly more complex example if your goal is to run the cheapest instance possible. In this situation, use the spot_price_current_min behavior: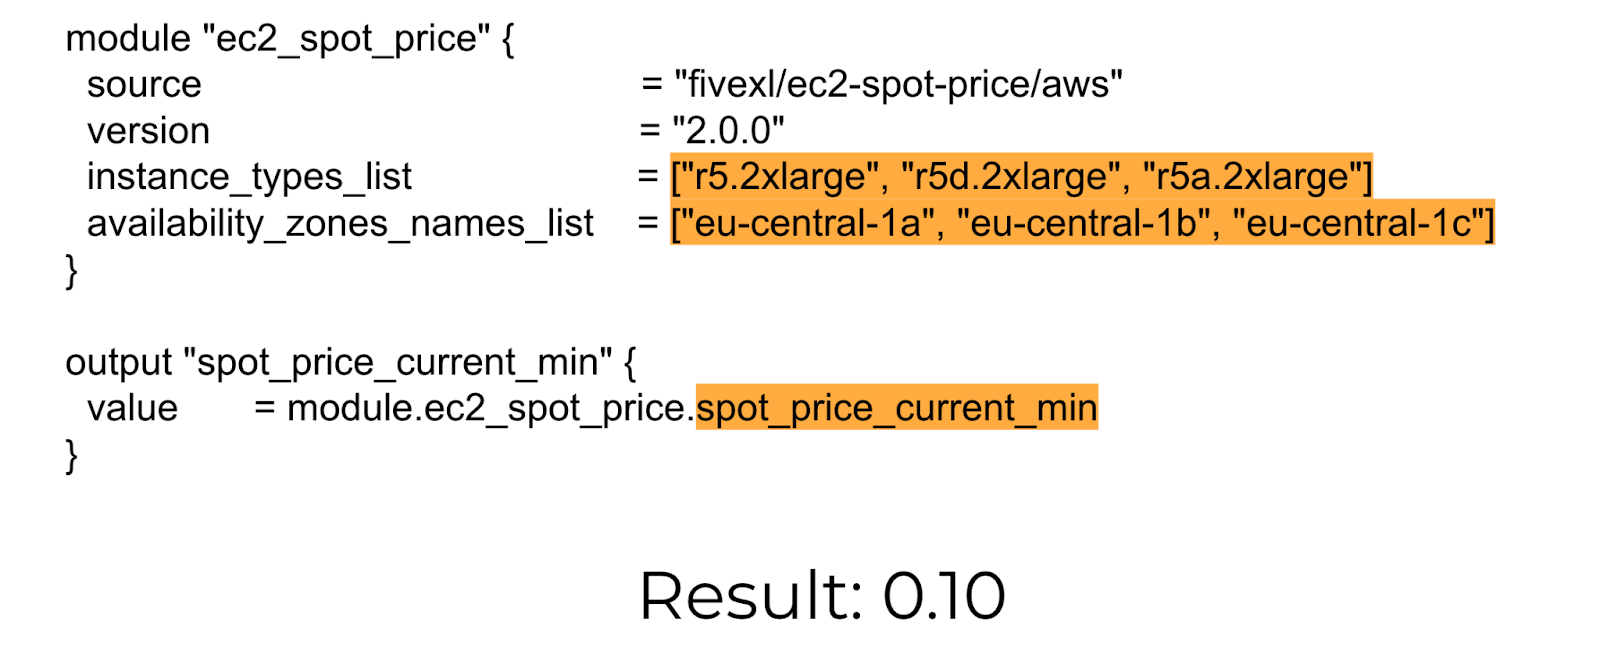
In this case, instances of at least one Instance Type will be launched in one Availability Zone. But even though multiple Availability Zones are passed, all instances end up in the same zone because only one is selected. Remember that there is always just one instance that is the cheapest.
Looking at our table, we can see that there is only one instance of type r5a in Availability Zone 1b with a minimum price of 0.10. As the prices change, you will receive the lowest price every time. For example, if the price starts to increase in one Availability Zone, the next time you use terraform apply, you’ll get the following minimum price, for example, from another Availability Zone. Of course, this behavior will cause interruptions most frequently, and if the price increases even by a little, you will immediately lose this instance. Therefore, this behavior is not very effective. A better approach is to look for the balance of price and availability.
Optimal Price
This behavior makes it possible to run at least one Instance Type in all Availability Zones, which solves the problem of determining which Instance Type is more cost-effective: t3, t3a, c5, or some of the r types. When prices change, you will switch to the most cost-effective Instance Types for each Availability Zone. If prices go up, you will lose one Availability Zone at a time, just like when you disable them. Returning to our table, we see a lot more options:
Only r5 instances will be available in Availability Zone 1c at 0.20. But if they increase to 0.30, you will still have two more Availability Zones and two other Instance Types. Important note: such a transfer will interrupt the work of those instances whose prices have increased. But when it comes to spots, you always need to be ready for interruptions and consider them commonplace. All of the previous options were focused on the highest savings, but if you need more stability, the spot_price_current_max behavior will do.
Maximum Current Price
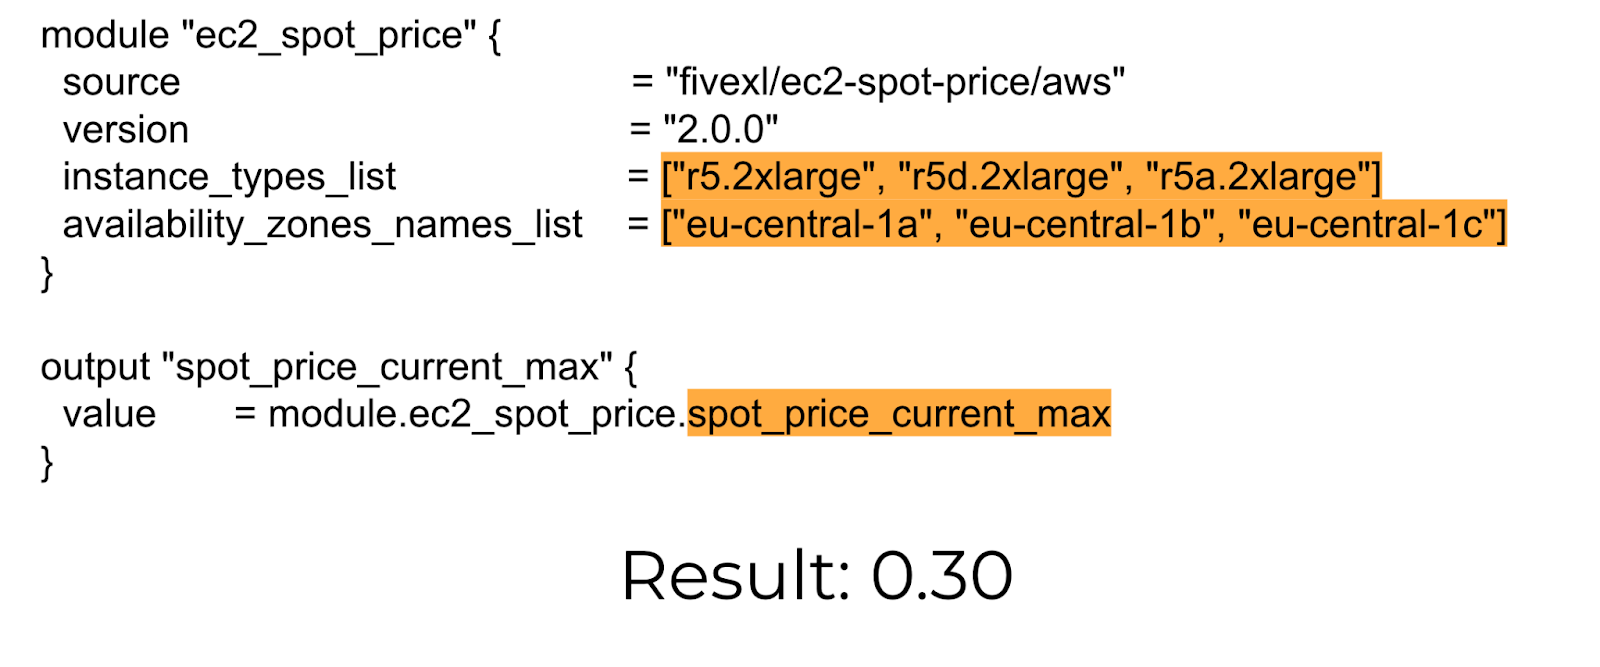
With this behavior, all Instance Types can be launched in all Availability Zones. This will solve the problem of having no Spot Instances by determining the price for different types. Also, this behavior allows for a large delay between terraform apply, and the module doesn’t need to be run as frequently. This is especially convenient if the module is sometimes run manually, not in CI/CD. In this case, judging by the table, any Instance Type can be launched in any AZ because none of them exceed the maximum price. This means that if you run r5 at 1a, which costs 0.20, you will pay that price up until it reaches 0.30. This behavior allows you to be autonomous from all Instance Types and Availability Zones. If you add many Instance Types, you can cover all cases and always have spots.
Modified Price
In case you need even more stability, and you are ready to sometimes pay an extra 5-10%, there is the spot_price_current_max_mod behavior:
This behavior reduces the possibility of interruptions from minor price fluctuations and will help if Terraform is run extremely rarely or manually. You can specify that you’re willing to pay in advance, for example, an extra 10% on top of the current price, i.e., 0.33 instead of 0.30. This is a small extra pay for reduced interruptions. Bear in mind that the extra pay largely depends on the number of instances you use. A difference of +2¢ can amount to $14 a month for each EC2 instance, and if you use 100 of them, it can turn into $1,400. Therefore, calculate whether reducing the possibility of interruptions is worth it for you. If you still think it’s worth it, you can apply this behavior to all other scenarios through the custom price modifier.
Applications of the EC2 Spot Price Module
The most basic problem the Terraform module solves is that it doesn’t let the price reach the ceiling so that you don’t end up with double the price. Therefore, it can be used anywhere you use an Auto Scaling Group. If you have an ECS Capacity provider, EKS-worker nodes, GitLab runners, any load that can be interrupted, build machines, residuals from monitoring, or a DevTest environment — they can be run entirely on spots. If you use the special flag ECS_ENABLE_SPOT_INSTANCE_DRAINING in ECS or the EKS Node Termination Handler for EKS, you can even start production right away. There have been cases when these worked entirely on spots.
Here is a more typical example — when one or two on-demand instances are launched in case everything is taken away. And anything that scales up is sent by spots because it’s not yet clear what the load will be, and nothing can be bought in advance.